Let’s get everyone on the same page. Let’s upload a picture of the invasion map routes as-is.

I’ve taken the liberty of reading other forum complaints about this map, but they all miss the point. People focus on barrage balloons being an issue, when it’s simply a sign of the primary issue at hand.
Map Design.
This map is abhorrently imbalanced in favor of the team with more capable vehicles available to their team.
What vehicles your team has dictates the roadblock the opposing team has to deal with. And unlike maps like D-Day, Ver-Sur-Mer, Le Bre and Vaux, there is no feasible way to flank around a defending team’s assets. Because apart from buildings, there is NO COVER. The map is too flat. There’s no terrain to use for concealment that’s in the playable area.
Now, if a player decides to use a tank, or a flak gun to defend, then you need to either:
- Brute-force it with your own vehicle
- Bomb it
Moreso because the map has inaccessible grey zones where tanks from either team can harass the other until they’re either destroyed by enemy armor, or a plane.
What this means is that, unless your team can destroy enemy armor before they have a pronounced effect, then you’re effectively mulched. Now, if your team’s plane slots are taken over by people who have ineffective CAS skills, then the only remaining solution is to bring out your own vehicle- And if that slot is taken, you’ll have no choice but to proceed on-foot, once again, IN THE OPEN.
Unless the defending team somehow has issues attacking people with no cover, then the only way to attack an objective is to hope an infantry attack works without any kind of concealment, or cover. This means that the attacking team is highly expected to suffer a high casualty count that it necessitates, you guessed it, the dreaded balloon popping, to shore up losses.
Now, let’s talk about each individual point.
-
1st Objective - A point that’s usually easily taken or defended by the team who sets up a rally to approach it. It’s relatively exposed from the side for armor to shoot through. The attacking team’s vehicles can fire potshots into the hangar, at risk of getting blown up by defending vehicles spawning near the 3rd point. Defending vehicles can camp the end of the runway to shoot at anyone spawning across the other side of the airfield.
-
Objective 2A - Another point that’s fair to both the attacking and defending teams. Both have good cover and concealment, and both have access to rally locations that have a roof over them. Defending vehicles can camp the end of the runway to shoot at anyone spawning across the other side of the airfield, but since the objective is fairly away from the runway, and rally locations can be set up without LoS into the airfield, it is usually not a problem.
-
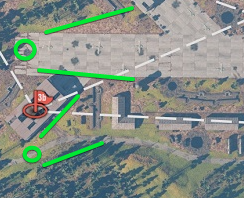
Objective 2B - One of the hard objectives to attack. Defenders have access to rally locations either from the bunker on the hill, which will have a good view of approaching attackers who have no effective cover except for a shallow trench, or from one of the adjacent barracks. Either way, A tank can set up in one of the circles below to cover the objective from either side:
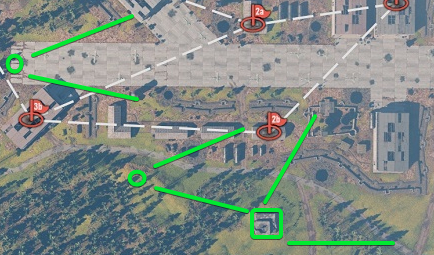
You need to either bomb the enemy vehicles, or use your own. Because the defending team has good arcs of fire. Better arcs of fire than what D-Day and Ver-Sur-Mer 1st point offers, to the point it is unflankable. -
Objective 3A. No rally point for attacking team that is well-concealed or protected. The only caveat is that the defending team is finally exposed to fire from attacking vehicles if they fail to deny the runway from them.

-
Objective 3B. The only protected rally location for the attacking team is the mess hall close to the airfield. Necessitates that the attacking team cover 60 meters of open ground with only a shallow trench for cover. Has a flanking route on the south for partial concealment, but can be fired upon by defenders coming through the SW door. Similar to 3A, the attacking team can suppress defenders if they fail to control the runway from vehicles.
-
Objective 4. No rallies with roofs for either team. Vehicles for either team are in the playable area and are no longer inaccessible. Both teams can bombard the point with planes given the open nature of this objective. Whether or not this objective is capped or defended is heavily dependent on the team with bomber pilots that can consistently harass incoming waves from the opposing team.
-
Objective 5. A reversal of the situation for the 2nd objectives. Attacking vehicles given free reign on dealing with defenders inside the hangar, much like how defenders were able to camp the end of the runway in previous objectives. Defending vehicles must choose a side of the hangar to defend.
I need to repeat my main points for posterity:
- Unless your team has access to vehicles that can deal with enemy vehicles, you’re just going to get mulched. This map is won by the team with the better vehicles and competent crews.
- Given the high casualty rate for attackers, balloons become the only way to offset losses from defending team having access to good cover and lanes of fire.
My personal proposals:
-
Reduce team dependency on vehicles. Limit lanes of fire and force them to position themselves in a way more accessible to either team.
-
Increase terrain variation and the number of hard cover that is usable. The map right now is practically pristine, but the bunker appears bombed. My idea is to increase the number of hills and craters to simulate battle damage, which would increase infantry cover for attackers. Can also add in more vehicle wrecks that can used for cover and concealment.
-
In combination with the other proposals, remove the barrage balloon mechanic. The two proposals above would limit the number of casualties inflicted by defenders, which would no longer necessitate attackers destroying balloons to offset the high attrition rate.